Skip down to page content.

Real Estate Information Archive

Blog

Displaying blog entries 1-4 of 4

New Castle County DE Real Estate Market Watch For October 2017

by Tucker Robbins

New Castle County DE listings decreased from 783 new listings in October 2016 down to 768 in October 2017. The average sales price decreased to $242,975, while days on market dropped by 15 days.

Courtesy of New Castle County DE Realtors Tucker Robbins and Carol Arnott Robbins.   

Displaying Framed Pieces!

by Tucker Robbins

Moving into a new home means looking for the right touch for the blank walls.  Artwork or family photos are the perfect fillers for these spaces, and hanging them can be a task.  Let’s look at some practical rules and tips for making those plain spaces come to life. 


Single Frames 

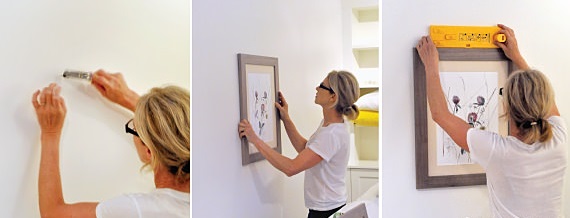
  • 1. Pick your space, picture to hang, and gather measuring tool, chalk or pencil, level, hammer and nails or screwdriver and screws. Picture-hanging kits can be purchased at hardware and home stores as well. 

  • 2. If the place you’ve chosen doesn’t have a stud for a nail, it is best to use an anchor and screw hanger.  These are inexpensive, and can be found in any hardware store.  Follow the easy instructions for installation for a strong mount for the picture. 

  • 3. Measure up to approximately 57” on the wall; this is where the center of your picture should be--average eye height. The top of the frame will obviously be higher. 

  • 4. Hold the frame up to the wall and use a pencil or some chalk to mark the approximate place for the nail/anchor screw. 

  • 5. Install the hardware you’ve chosen, and hang the frame. 

  • 6. Sometimes the frame doesn’t want to hang level.  Use self-stick rubber dots on the back corners of the frame; these will hold it in place, and protect the wall from damage. 


Gallery Walls 

  • 1. If you’re creating a gallery wall using several pieces, and include family snapshot photos, children’s artwork, art prints, and even fine art. 

  • 2. Create a clean, modern look by using the same style and color frames, same color palette, or same theme. 

  • 3. Use the largest picture for a focal point. Hang it first, using the 57” on-center idea. 

  • 4. Make templates of your artwork with newspaper.  Lay your pictures down on the paper, and trace around the edge. Cut the templates out. 

  • 5. Place the templates on the floor, or on the wall with masking tape, in any formation you like, changing the arrangement until it looks like a well-fitted puzzle. 

  • 6. Not all large pieces need to be in the center; a pleasing arrangement would have the focal point hanging to the left of your display, with smaller frames hung on the right.  

  • 7. Once you are satisfied with your mock-up gallery, hang the pictures using the first four tips. 


Bonus Display Tips 

  • 1. Renters or anyone who doesn’t want to bother with hammer and nails can use removeable sticky strips for framed pieces.  3M Command Strips are perfect for this easy display idea. 

  • 2. Use an art ledge for an easy display. These can be purchased at home stores and painted or stained to suit your style.  Attach to the wall at the 57” level, or 12” above the furniture, and place your pictures and artwork on them--no other hardware needed! 

  • 3. There are a multitude of free printables--seasonal and inspirational quotes--available on the internet.  Keep one or two spaces on your walls for a quick-change whenever you feel the need. 


No matter your decorating style, hanging framed items has a few rules that you should follow for aesthetics’ sake, but choosing what to display and how many is a personal decision.  Make your home your own by showing off what you love most, making the statement with your framed decorations. 


Courtesy of New Castle County DE Realtors Tucker Robbins and Carol Arnott Robbins.   


Photo credit: www.utrdecorating.com


Sprucing Up with Paint!

by Tucker Robbins

If finances are tight, but you’re ready to give your home a new look, paint is the budget-friendly way to go.  Making it a DIY project is even more cost-effective, and with so many options and ways to add color to your walls, you need some guidance so it will look like it was done by a pro. 


Which Paint and What Finish? 

  • 1. Latex paint is best for walls, and oil paint is perfect for wood trim, because it seals stains.  2. Oil paint takes longer to dry, and has a strong odor, but if you add a tablespoon of vanilla extract per gallon, and open the windows, it helps keep the odor in check.  

  • 3. Flat paint goes on easily, but doesn’t clean easily; glossy paint is great for cleaning, and comes in semi-gloss, and satin, but doesn’t cover wall imperfections. For a nice compromise, an eggshell finish is somewhat flat, but easy to clean. 


Choose Your Color 

  • 1. Choose a color for the room/s you’re updating, and don’t be afraid of using a bold color.  2. This adds character and some wow factor to your home. Neutrals are great for quick-change decorating, or if you’re thinking of selling soon. 

  • 3. Using pint-can paint samples, apply a 2x2 foot area of each color on the wall you’re planning to paint, allow to dry for 24 hours, and look at them at different times of the day.  4. You’ll get a more accurate feel for the color in the different lights, and whether you can live with it or not. 

  • 5. Don’t forget the ceiling! You can change the feel of the room’s height by going a shade darker (for a lower ceiling feel), or go a shade lighter or use a lighter color to give the illusion of a higher ceiling. 


Painting Prep 

  • 1. Measure your room for square footage, and make sure you buy enough paint--about one gallon per 400 square feet. 

  • 2. Purchase good painter’s tape, drop cloths, putty, a good putty knife, caulking, and any tools you may need for removing hardware from any doors or walls. 

  • 3. Protect light fixtures, trim, or wall sconces with painter’s tape.  Move furniture and put down drop cloths. Use wall putty or caulking to fill and smooth any holes or other wall damage. 

  • 4. Clean, sand, and dust walls, using a vacuum to make sure all of the dust is off the walls. 

  • 5. Priming the walls is really important if you’re covering a dark color, if there are stains on the walls, or if you’re painting paneling or new sheetrock. Tint the primer with a little of your new wall color before applying. 


Start Painting 

  • 1. Paint mixing isn’t 100% perfect. Professionals mix all of the gallon cans together in a five-gallon bucket for color uniformity.   

  • 2. Paint in corners and close to the ceiling with a good brush before you paint the walls, working your way down to catch drips. This process is called “cutting in.” 

  • 3. Working in an overlapping W-pattern, apply paint until you need to reload the roller.  If you notice paint drying quickly, work in 3-4 foot sections of wall, but a whole wall can be accomplished in the case of a slower drying process. 

  • 4. Smoothing the paint is important and is done by using what paint is left on the roller to paint as close to the ceiling and corners as possible, where you’ve already cut in. This gives a smooth appearance to the finish. 

  • 5. Clean your equipment as soon as painting is done:  latex paint can be washed off with dish detergent and warm water, but oil paint should be cleaned off with paint thinner.  

  • 6. Once the paint is dry, after about 24 hours, move your furniture back in, but hold off hanging anything on the walls for a few days, and don't wash them until the paint has cured, usually two weeks to thirty days. 


A newly painted room can make your home feel fresh, and make it look as if you’ve redecorated.  If you’re feeling really adventurous, try painting a pattern on your wall.  It may take more time, but the dramatic effect it makes in the room makes the wall a focal point in itself<span class="SpellingError SCXW241503921" style="margin: 0px; padding: 0px; user-select: text; -webkit-user-drag: none; -webkit-tap-highlight-color: transparent; background-repeat: repeat-x; background-position: left bottom; background-image: url(" data:image="" gif;base64,r0lgodlhbqaeajecap="" 8aaaaaaaaaach5baeaaaialaaaaaafaaqaaaiilgaxcchrtcgaow="=&quot;);" border-bottom:="" 1px="" solid="" transparent;"="">diy Network has some great tips for a patterned accent wall here.


Courtesy of New Castle County DE Realtors Tucker Robbins and Carol Arnott Robbins  


Photo credit: markspaintingblog.com


Preventing Pests in Your Home

by Tucker Robbins

We normally associate pests and insects with Summer time, but now is a good time to think about what you can do to prevent creepy crawlers coming in to your home. It’s a simple matter of checking the outside as well as the inside, and staying ahead of them. 


Exterior 

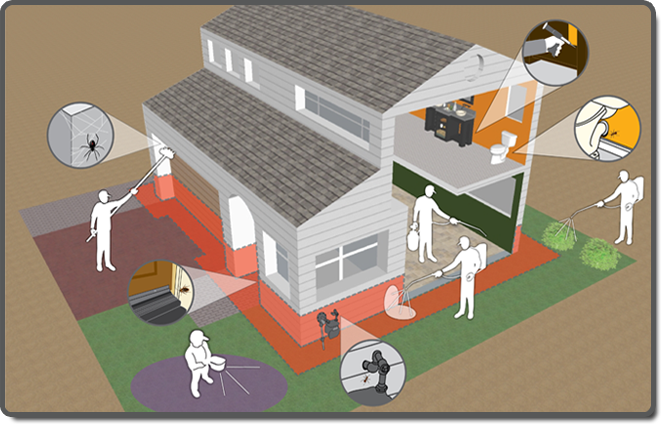
  • 1. When you mulch plants, keep it from piling up against the house’s foundation. Insects can use the mulch for overwintering, but if you could add a border of rock or stone between the mulch and the house, or even use cedar mulch, it would discourage pests. 

  • 2. Inspect your foundation carefully for cracks or holes, as well as places where utility pipes and wires enter your home.  Cover or fill them with wire screen mesh, cement, or metal flashing. 

  • 3. Outside lights, when left on, draw flying insects, but if you can change the bulbs from incandescent to halogen, they are less attracted to the glow.  

  • 4. Check doors and windows for openings and seal them with caulking or weather-stripping, and repair any holes in your screens.

  • 5. Keep trash cans and surrounding areas clean, and make sure lids fit tight. Recyclables should be rinsed well, and container lids put back on before tossing them in the recycle bin. 

  • 6. If you have anything that can retain water, empty it as often as possible, and use a larvicide in your landscape’s water features.   

  • 7. If you use firewood, store it away from your home, at least thirty feet. 

  • 8. Gutters should be cleaned periodically, not only for their efficiency, but to help keep pests from making a home in the debris. 


Interior 

  • 1. The most important pest prevention tip for the inside of your home is cleanliness.  Keep crumbs off the counters and floors, clean food messes immediately, and keep food consumption limited to the kitchen. Wash up dishes before going to bed at night.  

  • 2. Storing open food in plastic containers with lids or plastic storage bags will lessen the chances of pests finding it. 

  • 3. Check stored grains, (flour, sugar, cornmeal), often, and discard it as soon as the expiration date passes.  Storing these in a sealed container is best. 

  • 4. Pet food is best kept in a storage container with a tight-fitting lid. 

  • 5. Keep inside garbage in a trash can fitted with a bag, and keep the lid closed. Remove the bag to the outside can as soon as it’s full. 

  • 6. Vacuum carpets frequently, especially if you have pets.  They can bring in little hitch hikers when they come in from being outdoors. 

  • 7. Inspect all baseboards, and replace or repair them if they’re broken, and walls should be checked for holes, and repaired as soon as possible. 


If you see pests in or out of your home, it’s best to call a professional to address the problem, and do it quickly so you don’t suffer an infestation.  Once you know you’re clear of bugs, it only takes a few minutes each week to keep them from feeling at home in your home.  


Courtesy of New Castle County DE Realtors Tucker Robbins and Carol Arnott Robbins.   


Photo credit: www.gopherthekill.com


Displaying blog entries 1-4 of 4

Syndication

Categories

Archives

Quick Search

Contact Information

Photo of Tucker Robbins Real Estate
Tucker Robbins
Berkshire Hathaway HomeServices
3838 Kennett Pike
Wilmington DE 19807
(302) 777-7744 (direct)