Displaying Framed Pieces!
Moving into a new home means looking for the right touch for the blank walls. Artwork or family photos are the perfect fillers for these spaces, and hanging them can be a task. Let’s look at some practical rules and tips for making those plain spaces come to life.
Single Frames
-
1. Pick your space, picture to hang, and gather measuring tool, chalk or pencil, level, hammer and nails or screwdriver and screws. Picture-hanging kits can be purchased at hardware and home stores as well.
-
2. If the place you’ve chosen doesn’t have a stud for a nail, it is best to use an anchor and screw hanger. These are inexpensive, and can be found in any hardware store. Follow the easy instructions for installation for a strong mount for the picture.
-
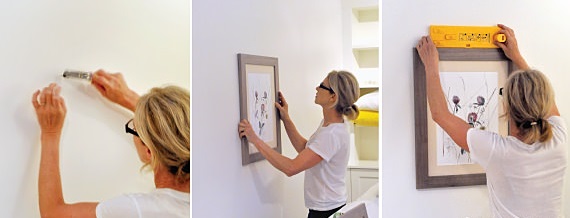
3. Measure up to approximately 57” on the wall; this is where the center of your picture should be--average eye height. The top of the frame will obviously be higher.
-
4. Hold the frame up to the wall and use a pencil or some chalk to mark the approximate place for the nail/anchor screw.
-
5. Install the hardware you’ve chosen, and hang the frame.
-
6. Sometimes the frame doesn’t want to hang level. Use self-stick rubber dots on the back corners of the frame; these will hold it in place, and protect the wall from damage.
Gallery Walls
-
1. If you’re creating a gallery wall using several pieces, and include family snapshot photos, children’s artwork, art prints, and even fine art.
-
2. Create a clean, modern look by using the same style and color frames, same color palette, or same theme.
-
3. Use the largest picture for a focal point. Hang it first, using the 57” on-center idea.
-
4. Make templates of your artwork with newspaper. Lay your pictures down on the paper, and trace around the edge. Cut the templates out.
-
5. Place the templates on the floor, or on the wall with masking tape, in any formation you like, changing the arrangement until it looks like a well-fitted puzzle.
-
6. Not all large pieces need to be in the center; a pleasing arrangement would have the focal point hanging to the left of your display, with smaller frames hung on the right.
-
7. Once you are satisfied with your mock-up gallery, hang the pictures using the first four tips.
Bonus Display Tips
-
1. Renters or anyone who doesn’t want to bother with hammer and nails can use removeable sticky strips for framed pieces. 3M Command Strips are perfect for this easy display idea.
-
2. Use an art ledge for an easy display. These can be purchased at home stores and painted or stained to suit your style. Attach to the wall at the 57” level, or 12” above the furniture, and place your pictures and artwork on them--no other hardware needed!
-
3. There are a multitude of free printables--seasonal and inspirational quotes--available on the internet. Keep one or two spaces on your walls for a quick-change whenever you feel the need.
No matter your decorating style, hanging framed items has a few rules that you should follow for aesthetics’ sake, but choosing what to display and how many is a personal decision. Make your home your own by showing off what you love most, making the statement with your framed decorations.
Courtesy of New Castle County DE Realtors Tucker Robbins and Carol Arnott Robbins.
Photo credit: www.utrdecorating.com